3.1.4 with GUI
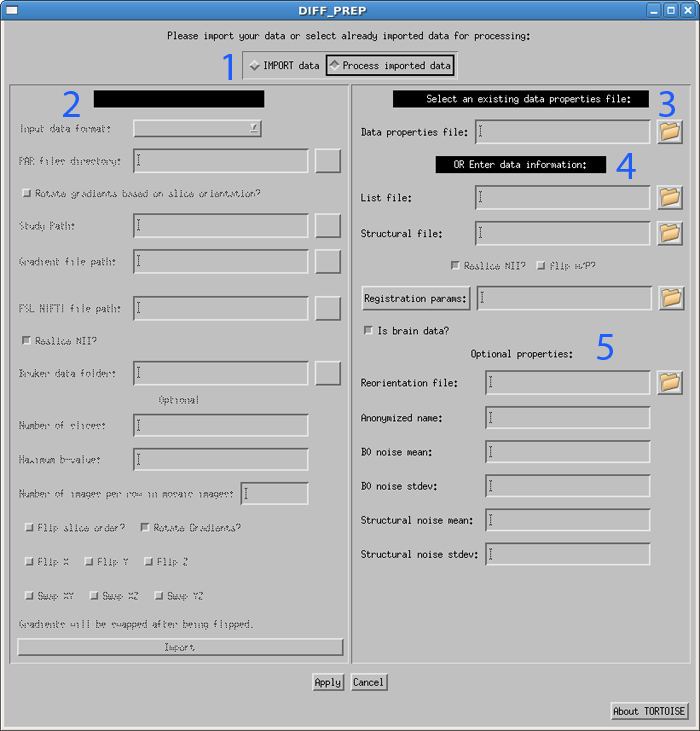
Another option to run the software is to automatically create the data properties file with a GUI. When the user runs either diffprep_gui or prepvm, a graphical user interface to create the data description file will be displayed (the large blue numbers only appear in this graphic as an aid to this description):

The GUI has 2 sides; one for data import and one for data processing. The appropriate side is selected using the radio buttons marked by the blue number 1 in the figure above. "IMPORT data" options are described in the next section, "Process imported data" options are described here.
When the user selects the "Process imported data" radio button, all the buttons and text boxes on the right hand side of the window will be enabled and everything on the left hand side will be disabled.
The Process imported data side has 2 main areas. The user can use the "Select data properties file" option (marked by number 2) if he/she has an existing data description file for the data. Otherwise the user should use section 4 to enter the necessary information in the corresponding fields. Note that the section 5 represents optional parameters that may also be entered at this time.
The user can choose to enter the full path to the data description file on the textbox labeled with 2 or can press the button on the right to browse for the file. When the correct path is displayed in the textbox, pressing "Apply" at the bottom of the window will cause DIFF_PREP to run with the existing data description file.
If the user does not have a data description file already created for the data, information will need to be entered in section 4. The user now can enter the required information about the data in the textboxes or can browse for the paths by pressing the corresponding buttons. The textboxes labeled with 4 are for recommended information (all but the structural image are MANDATORY) and the ones labeled with 5 are optional. These fields are described in detail in the data description file section of this user manual.
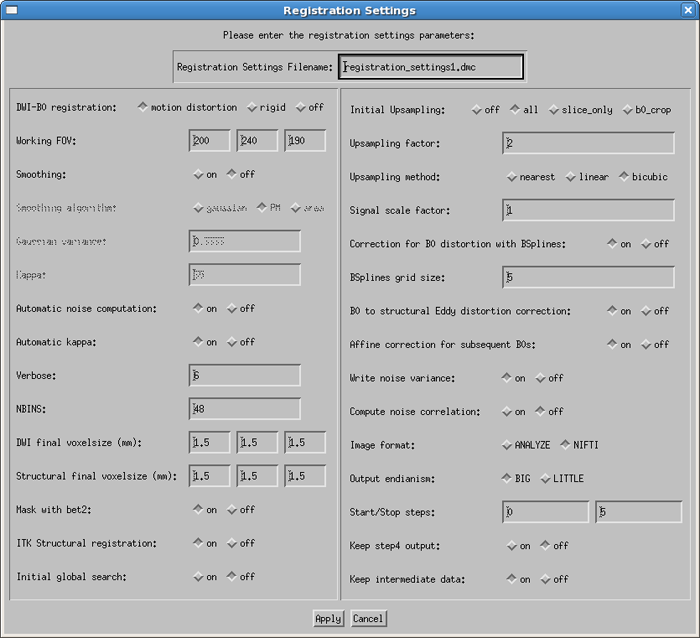
When entering the name of the registration settings file in area 4, the user can choose to either enter an existing file name, or create a new registration settings file using a GUI, shown below. The registration settings file is described in detail in the registration settings section of this guide. Important: please note that the default name for the settings file is registration_settings1.dmc. The user should enter a new name which is meaningful to them for future use/reference. For example, tumor_patient_grp.dmc or control_group.dmc, etc.

After the desired settings are selected, hit apply, and a new registration settings file will be created in your DIFF_PREP_WORK directory. If a file already exists with the selected name, you will be prompted to overwrite the file, or cancel and enter a unique name for the settings file. This will then put you back in the main diffprep GUI.
After all information is entered in the main GUI, when the user presses the "Apply" button, a new data description file is created in the PROCBASE folder with the name "list_file_name.xml" and DIFF_PREP is run with this newly created file. If the user wishes to process the same data again at a later time, he can use the "Select data properties file" section and use this data description file and will not need to re-enter the information.
